

Changing the ink to your HP printer is a honest method that ensures your prints stay crisp and colourful. Whether you're a pro printer consumer or new to the world of printing, understanding how to alternate ink cartridges can prevent time and frustration. In this manual, we'll stroll you via the stairs to replace ink cartridges for your HP printer successfully.
Step 1: Gather Your Supplies
Before you begin, gather the vital elements:
1. New Ink Cartridge: Make certain you've got the ideal alternative cartridge on your HP printer version. You can find this facts for your printer's guide or on HP's professional website.
2. Paper Towels or Clean Cloth: These will be handy for cleansing any ink residue or dirt.
3. Printer Manual: Keep your printer guide close by for reference, in particular in case you're unusual with the process.
Step 2: Prepare Your Printer
1. Turn On Your Printer: Press the electricity button to show in your HP printer.
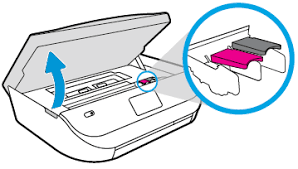
2. Open the Printer Cover: Lift the printer cowl or access door. Wait for the cartridge carriage to transport to the center of the printer and turn out to be idle.
Step 3: Remove the Old Cartridge
1. Identify the Cartridge: Each ink cartridge slot is labeled with a coloration (e.G., black, cyan, magenta, yellow). Identify the cartridge you want to update.
2. Remove the Old Cartridge: Press down gently at the old cartridge to release it. Pull the cartridge out of its slot closer to you.
Step 4: Prepare the New Cartridge
1. Unpack the New Cartridge: Take the brand new cartridge out of its packaging. Remove any shielding tapes or covers from the cartridge.
2. Shake the Cartridge (Optional): Some cartridges can also advantage from a mild shake to frivolously distribute the ink inner. Refer to the cartridge manual for specific commands.
Step 5: Install the New Cartridge
1. Insert the Cartridge: Hold the new cartridge with the contacts facing down and the nozzle facing the printer. Slide it into the perfect slot till it clicks into vicinity.
2. Close the Printer Cover: Once the brand new cartridge is established, near the printer cowl or get admission to door securely.
Step 6: Align the Cartridges (If Necessary)
Some HP printers require cartridge alignment after putting in a new cartridge. If brought on, comply with those steps:
1. Print an Alignment Page: Go on your printer's menu or settings and select the choice to print an alignment page.
2. Scan the Alignment Page: Place the alignment page face down on the scanner glass and comply with your printer's instructions to test it. This system ensures that the cartridges are successfully aligned for most appropriate print first-class.
Step 7: Test Your Printer
1. Print a Test Page: To ensure the brand new cartridge is operating correctly, print a test web page from your computer or immediately from the printer's manage panel.
2. Check Print Quality: Examine the take a look at page for any issues such as streaks, smudges, or faded colorations. If you be aware any troubles, consult with your printer guide for troubleshooting steps.
Additional Tips and Considerations
Store Unused Cartridges Properly: If you have got extra ink cartridges, keep them in a groovy, dry area far from direct sunlight.
Use Genuine HP Cartridges: To make certain the quality overall performance and print exceptional, always use real HP ink cartridges.
Recycle Old Cartridges: Consider recycling your vintage ink cartridges through HP's recycling software or local recycling centers.
Conclusion
Changing the ink cartridges for your HP printer is a easy procedure that may be finished fast with the right steps. By following this guide and referring to your printer guide as wished, you may maintain foremost print best and maintain your printer running easily. Happy printing!